Are you a bit of a car audio geek?
Do you enjoy upgrading and modifying your car stereo system?
If so, you’ll likely be interested in the array of colors that different wires can have in an aftermarket installation.
By understanding the purpose of each wire and its associated color, you can make your installation look clean and professional – and everything will work perfectly when it’s all hooked up.
This blog post will answer that question and more. Keep reading to learn everything you need to know about installing a new car stereo system!
What Color Wires Go Together In A Car Stereo?
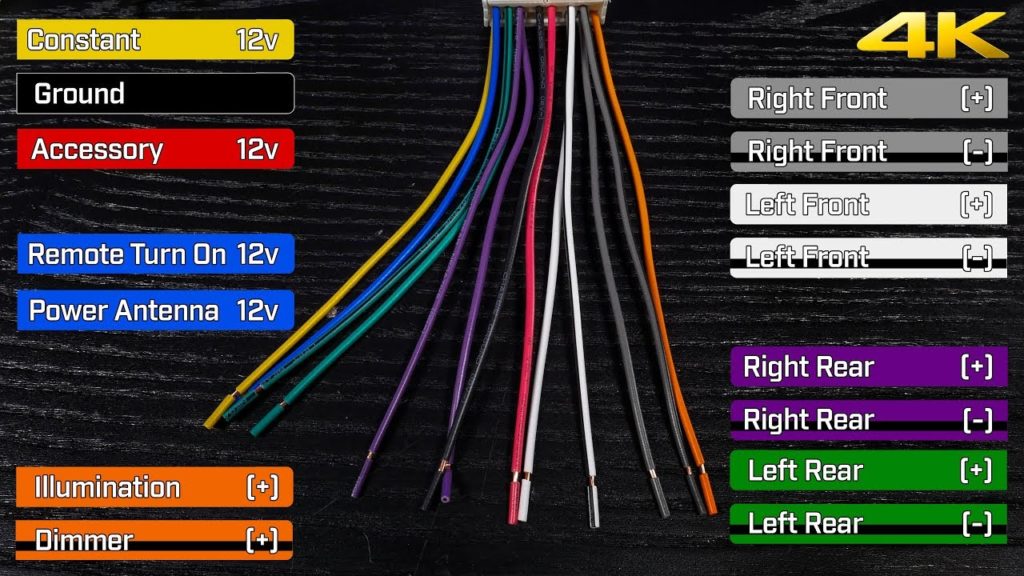
Car stereo wire colors can vary depending on the specific car and stereo model, but there are generally accepted standards. Here’s a breakdown of the common ones:
Power Wires:
- Yellow: Constant 12V (Battery): This wire provides constant power to the stereo, even when the car is off. It’s typically used to maintain memory settings.
- Red: Accessory: This wire provides power only when the car’s ignition is turned on (accessory mode or radio mode).
Ground Wire:
- Black: Ground: This wire connects the stereo to the car’s metal chassis, completing the electrical circuit.
Speaker Wires:
- White: Left Front Speaker (positive)
- Gray: Right Front Speaker (positive)
- Green: Left Rear Speaker (positive)
- Purple: Right Rear Speaker (positive)
- Black with stripes (usually gray or white): These are negative speaker wires. Their colors can vary depending on the car manufacturer, so double-check your car’s wiring diagram for confirmation.
Other Wires:
- Blue or Blue with White Stripe: Antenna: This wire is used to power an automatic antenna or connect to an aftermarket antenna.
- Orange or Orange with White Stripe: Dimmer/Illumination: This wire connects to the car’s lighting system, allowing the stereo’s brightness to adjust with the dashboard lights.
Aftermarket Car Stereo Wire Colors Code Table
| Color | Type | Polarity | Description |
|---|---|---|---|
| Red | Power | + | 12V Ignition (Accessory Power) |
| Yellow | Power | + | 12V Constant Power (Battery) |
| Orange | Power / Illumination | + | 12 V Dimmer/illumination wire (adjusts brightness with dash lights) |
| Black | Grounding | – | Stereo Chassis Ground |
| Blue | Antenna | + | Antenna Power |
| Blue / White Stripe | Amplifier | + | Amplifier Turn On |
| Grey | Speaker | + | Right Front Speaker |
| Gray / Black Stripe | Speaker | – | Right Front Speaker |
| Purple | Speaker | + | Right Rear Speaker |
| Purple / Black Stripe | Speaker | – | Right Rear Speaker |
| White | Speaker | + | Left Front Speaker |
| White / Black Stripe | Speaker | – | Left Front Speaker |
| Green | Speaker | + | Left Rear Speaker |
| Green / Black Stripe | Speaker | – | Left Rear Speaker |
| Pink | Misc. | + | Vehicle Speed Sense |
| Brown | Misc. | + | Audio Mute |
| Light Violet | Misc. | + | Reverse Gear Trigger |
| Light Green | Misc. | – | Parking Brake |
You may also want to know:
How to connect car stereo wires: Step-by-Step Guide
Before you begin
- Safety first! Disconnect the negative battery terminal of your car to avoid electrical shocks.
- Gather your tools: wire strippers, crimpers, electrical tape or heat shrink tubing, butt connectors (optional), and a car stereo wiring harness (usually purchased separately based on your car model and stereo). You may also want to consider a dash kit (for a clean installation) and a stereo removal tool (specific to your car model).
Step 1: Identify the wires
Both your car and the new stereo will have wire harnesses with various colors. Consult the car stereo’s wiring diagram (usually in the user manual) and the wiring harness guide (often included with the harness) to identify the function of each colored wire (e.g., constant power, ground, speaker wires).
Step 2: Connect the power wires:
Find the constant power wire on the stereo harness (usually yellow or blue). Match it with the constant power wire on the car harness (usually the same color).
Strip a small section of insulation (around ¼ inch) from each wire using the wire strippers.
You can now connect these wires in two ways:
Using butt connectors (recommended)
Insert both stripped wires into a butt connector, crimp it securely with the crimping tool, and insulate the connection with electrical tape or heat shrink tubing (applied with a heat gun).
Wire Twisting (not recommended but possible)
Carefully twist the stripped ends of the wires together, then secure them tightly with electrical tape or heat shrink tubing.
Step 3: Ground the stereo
Locate the ground wire on the stereo harness (usually black).
Find a suitable metal spot in the car’s dashboard area (free of paint or rust) to connect the ground wire. Scrape off a small patch of metal for a clean connection.
Secure the ground wire to the bare metal using the same method as the constant power wire (butt connector or twist and tape).
Step 4: Connect the speaker wires
Following the wiring diagrams, identify the speaker wires on the stereo harness (usually 4 wires with different colors representing front left, front right, rear left, and rear right speakers). Match these with the corresponding speaker wires on the car harness (colors might differ).
Following the same method as the constant power wire, connect each speaker wire using butt connectors or twisting and taping.
Step 5: Double-check and secure connections
Meticulously examine all your connections to ensure they’re secure and no bare wires are exposed.
Use zip ties or wire loom (optional) to organize and bundle the wires together for a clean look.
Step 6: Reconnect the battery
Reattach the negative terminal of your car battery.
Step 7: Test and install
Turn on the stereo and test all the speakers to ensure they’re working properly.
If everything works, you can proceed with installing the stereo into the dashboard (consult a car stereo installation guide or refer to online resources specific to your car model for this step).
Here’s a pro tip for you:
Label your wires! Especially if your car or stereo has wires that aren’t color-coded according to industry standards, taking a moment to label them before disconnecting anything can save you a lot of headache later. You can use masking tape and a marker to write down the function of each wire (e.g., “Constant Power,” “Front Left Speaker”) on the insulation near the connector. This will make it much easier to identify the correct wires when making connections with the new stereo, and ensure everything gets hooked up properly.
Additional Tips:
- Take pictures of the car’s original wiring harness before disconnecting anything in case you need to refer back later.
- If you’re not comfortable with electrical work, consider seeking help from a professional car audio installer.
Pioneer Double DIN radio wiring Colors

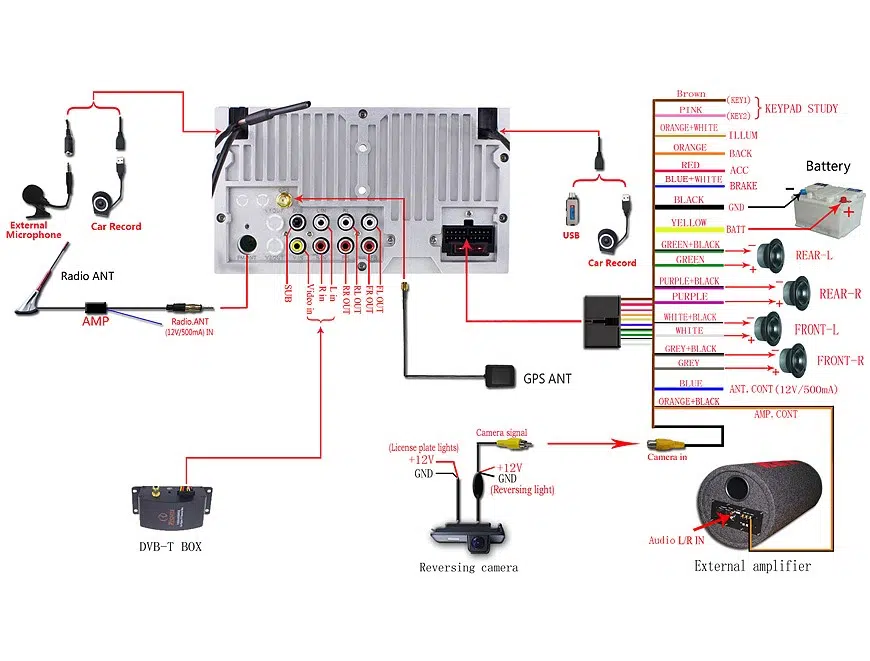
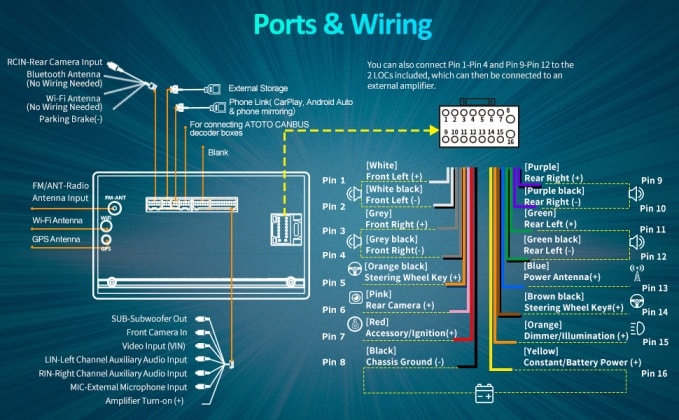
Chinese Android car stereo wiring colors

FAQs
What is the pink wire on car stereo
The function of the pink wire in car stereos isn’t universal and can vary depending on the specific model and manufacturer (including Pioneer, ATOTO, and others). Here are the two most common uses for a pink wire:
- Speed Pulse Output: This is the more common function. The pink wire transmits a signal related to the vehicle’s speed. This information can be used by some stereos, particularly navigation units, for features like:
- Speed-dependent volume adjustment: Automatically increases or decreases volume based on vehicle speed to compensate for road noise.
- Map speed synchronization: Shows the vehicle’s speed on the navigation map display.
- Non-functional: Not all stereos utilize the pink wire. In some cases, it might not be connected or have any specific purpose.
What happens if you mix up positive and negative speaker wires?
Mixing up the positive and negative speaker wires won’t damage your speakers or equipment. However, it will affect the sound quality you hear:
- Weakened bass and overall sound: The speaker cone movement will be out of phase, meaning the positive and negative movements that create sound waves will partially cancel each other out. This can lead to a noticeable decrease in volume, especially in the bass frequencies.
- Muddy or distorted sound: Out-of-phase speakers can cause certain sound frequencies to cancel out more than others, creating an unclear and distorted listening experience.
This effect is more pronounced with multiple speakers. If only one speaker is wired incorrectly, the impact might be subtle. But with multiple speakers out of phase, the soundstage can become messy and lack definition.
How do you know which speaker wire is positive and negative on a vehicle?
Generally speaking, the white wire is going to be negative and the black or brown wire is going toe positive. Sometimes, however, the speakers are color-coded so that it’s immediately obvious which is which (red for positive and blue for negative, for example). If your vehicle has this type of coding, simply follow the colors.
If there’s no color-coding and you’re not sure which is which, there are a few ways you can test it out. First, try using a voltmeter or continuity tester on the wires. If you touch the probe to one wire and get a reading, then that’s your positive wire.
Related Articles